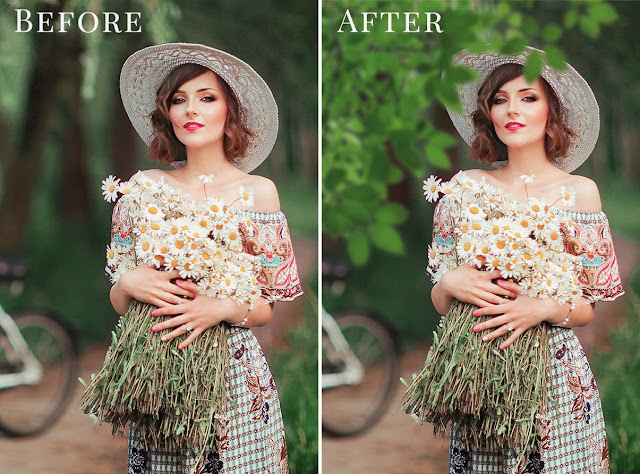

Frost Snow Storm Effect Photoshop Action Free Download This Photoshop Action transform your photos into professional smokey snowstrom frost effects. Highly detailed result, a lot of possibilities to easy customize and improve. One click action.You Can Also Download Destroyer Effect Fantasy Photoshop Action

This action is specially made for photographers, graphic designer & artists.The action has been tested and working on Photoshop (English versions) CS3, CS4, CS5, CS6, CC, CC2014, CC2015, CC2015.5,CC2017, CC2018, CC2019, CC2020, CC2021+.You Can Also Download Dark Energizers Effect Photoshop Action
Features:
- Professional Cover Poster Creator
- Very Easy To Customize
- ATN File Included
- ABR File Included
- ‘ReadMe’ Help File Included
- Video Instructions Included
Photo credit:
- Pexels
- Pixabay
RULES & RECOMMENDATIONS
1. use photo sizes between 2500–3500px
2. use photo resolution between 72-300dpi
3. use RGB and 8bit color mode in Photoshop
4. use English versions of Photoshop CS3, CS4, CS5, CS6, CC, CC2014, CC2015, CC2015.5,CC2017, CC2018, CC2019, CC2020, CC2021+.
5. use your photo as the background (Layer -> New -> Layer from Background)
Download the File Easily From the Download Link Given Below
Password is: dgpik.com
DOWNLOAD NOWFrost Snow Storm Effect Photoshop ActionHow to Load Photoshop Action
1. Open Photoshop 🙂
2. Make sure your ACTIONS palette is open. If not, go to WINDOW – ACTIONS.
3. In the actions palette on the top right corner click on the lines icon. Next, click on LOAD ACTIONS.
4. Select the action you wish to install and then click OPEN.
5. Your ACTION will now appear in the actions palette and are ready to be used.
HOW TO INSTALL THE BRUSHES
1. Open Photoshop 🙂
2. Make sure your select the BRUSH tool on TOOLS panel. If not, go to WINDOW – TOOLS.
3. In the brushes palette on the top right corner click on the icon. Next, click on LOAD BRUSHES.
4. Select brushes you wish to install and then click OPEN.
5. Your BRUSHES will now appear in the brushes palette and are ready to be used.
HOW TO USE THE ACTION
1. Install the Action, Brushes (see instructions above)
2. Open your photo. Make sure your photo as the background (Layer -> New -> Layer from Background)
3. Create a new layer above the background layer and called it “brush”. Rename the layer to “brush” (Important: all letters must be lower case). To do that, double click on layer name and type “brush”. Don’t forget to do it!!!
4. With the “brush” layer selected, brush (use any color brush) onto the area of photo.
5. Click play button on action panel. That’s all!
6. You can also customize and improve the result.