
Berries Packaging Pouch Psd Mockup Free Download is a perfect way to present your designs in an elegant and photo realistic way. You can easily edit the mockup via smart objects or you can use the mockup as it is. Berries are a delicious and healthy fruit that is great for health. You Can Also Download Water Bottle Packaging PSD Mockup
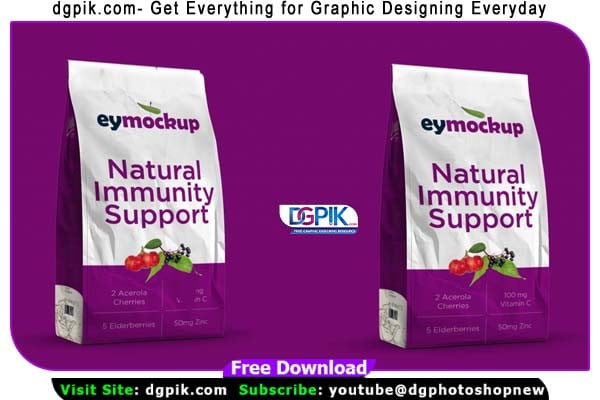
You can use this mockup to showcase your new berry product design in a professional way. This berry packaging Psd Mockup is fully customizable and easy to use. Use this mockup to showcase your berry product packaging design in a realistic way to attract more customers towards your business.You Can Also Download Luxury Scent Packaging Psd Mockup
You can use this mockup to showcase your new berry product design in a professional way. This berry packaging mockup PSD is fully customizable and easy to use. This is a packaging pouch mockup that you can use to showcase your product branding.You Can Also Download Baby Cosmetic Packaging PSD Mockup
Description:
- Available Format: Layered PSD through smart object insertion
- License: Free for personal and commercial use
- Zip File Includes: Photoshop PSD File
- Resolution: 2200 x 1500 px
Download the File Easily From the Download Link Given Below
Password is: dgpik.com
DOWNLOAD NOWBerries Packaging PouchHow to Use PSD Mockup
Using a PSD mockup is a great way to showcase your designs or products in a realistic and professional manner. Here are the steps to use a PSD mockup:
- Download the PSD mockup file: Find a suitable PSD mockup from reliable sources and download it to your computer.
- Extract the files: If the mockup file is compressed (e.g., in a ZIP folder), extract the files to a location on your computer.
- Open the PSD file: Locate the main PSD file in the extracted files and open it in Adobe Photoshop or a similar software that supports PSD files.
- Edit the smart objects: Within the PSD file, you’ll find smart objects that represent the areas where you can insert your own designs. Double-click on these smart objects to open them in a new window.
- Insert your design: In the new window, you can paste or drag and drop your design into the smart object. Ensure that your design fits well within the designated area and adjust it if necessary.
- Save and close the smart object: After inserting your design, save the changes made to the smart object and close the window. The main PSD file will now update with your design.
- Customize the mockup: Depending on the mockup, you may have additional customization options such as adjusting colors, shadows, or background elements. Use the available layers and adjustment tools to make desired modifications.
- Save and export: Once you are satisfied with your mockup, save the final version as a PSD file to preserve the layers and editable elements. If you need to share the mockup or use it in other applications, export it to a suitable file format like JPEG or PNG.
Remember to refer to any specific instructions or documentation provided with the mockup for detailed guidance.