
50 Portrait Mega Photoshop Action Set 2 Free Download is a powerful collection of Photoshop Actions designed for enhancing and retouching portrait photographs. With over 50 unique actions, it offers a wide range of effects and adjustments, including skin smoothing, color correction, sharpening, and creative enhancements. It simplifies the editing process and helps achieve professional-looking portrait results. You Can Also Download 3100 Professional Cinematic LUTs Collection

See what you will be able to do
Below you can find Photoshop Action Examples from each Package.
![]()
Download the File Easily From the Download Link Given Below
Password is: dgpik.com
DOWNLOAD NOW50 Portrait Mega Photoshop ActionHow to Load Photoshop Action
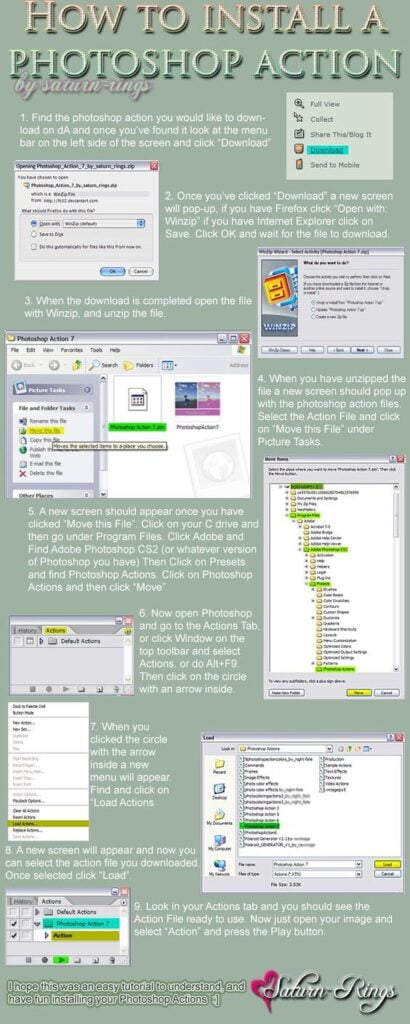
Using Photoshop actions can greatly streamline your workflow and help you automate repetitive tasks. Here’s a step-by-step guide on how to use Photoshop actions:
- Install the Action: Start by downloading and installing the Photoshop action you want to use. Typically, actions come in .atn file format. To install the action, simply double-click on the .atn file, and Photoshop will load it into the Actions panel.
- Open the Actions Panel: To access the Actions panel in Photoshop, go to “Window” in the menu bar and select “Actions.” The Actions panel will appear on your screen.
- Load the Action Set: In the Actions panel, you’ll find a small dropdown menu icon (three horizontal lines). Click on it and select “Load Actions” from the menu. Locate the folder where you saved the .atn file, select it, and click “Load.”
- Play the Action: Once you’ve loaded the action set, you’ll see a list of individual actions within the set. Each action represents a specific task or effect. To apply an action, select the desired action in the Actions panel.
- Run the Action: To run the action, simply click on the “Play” button at the bottom of the Actions panel, or you can press the “Enter” (Windows) or “Return” (Mac) key. Photoshop will execute the action, automatically applying the predefined steps and adjustments to your image.
- Customize the Action (optional): Some actions may have customizable settings or options. After selecting an action in the Actions panel, you can click on the small triangle icon beside the action name to expand its options. You can modify parameters such as opacity, blending modes, or color adjustments to tailor the action’s effect to your liking.
- Batch Processing (optional): If you have multiple images you want to apply the action to, you can use the Batch Processing feature. Go to “File” in the menu bar, then select “Automate” and choose “Batch.” In the Batch dialog box, select the action set and specific action you want to use, choose the source folder where your images are located, set the destination folder for the processed images, and specify any additional options. Click “OK,” and Photoshop will automatically apply the action to all the images in the specified folder.
That’s it! By following these steps, you can effectively use Photoshop actions to automate various editing tasks and achieve consistent results across multiple images.